Step 1
Install the Advance Auto Product Post Template
In your downloaded files, open up the blogrcart-mukabuku-AUTO-POST-TEMPLATE.txt file and copy the codes included in the file.
Now in your Blogger dashboard > Settings > Post and Comments > Post Template > click the "add" link and paste the codes you have copied from blogrcart-mukabuku-AUTO-POST-TEMPLATE.txt file > Click Save Settings.
By request for Freemium BlogrCart Mukabuku theme users, copy & paste the Auto Post Template here http://blog.irsah.com/2014/09/blogrcart-mukabuku-blogger-e-commerce.html . A 1 page installation page is also live at our blog.

By installing this auto product post template, it will allow you to easily post your product by editing inside the pre-built boxes. This includes adding main product image, product description, pricing, select options for colour & size, a section for additional product image thumbnails.
You can also DISABLE Blogger pre-installed light box at screenshot below.

Step 2
Shopping Cart Plug-in SettingsHover to your Blogger widgets drop down and select HTML99 to navigate to the widget codes:-

2.1 Insert Ref: Send Order URL
Expand <b:includable id='main'> by clicking the black triangle.

An example of your reference Send Order URL would look like so:-
http://YOUR-BLOG-NAME.blogspot.com/p/send-order.html
Insert Ref:Send Order URL here:-
How to check your Ref:Send Order URL?
- Go to Pages > Hover to the "Send Order" link > click the "View" link to go to the "Send Order" page.
- At your browser, grab the URL at the browser bar.

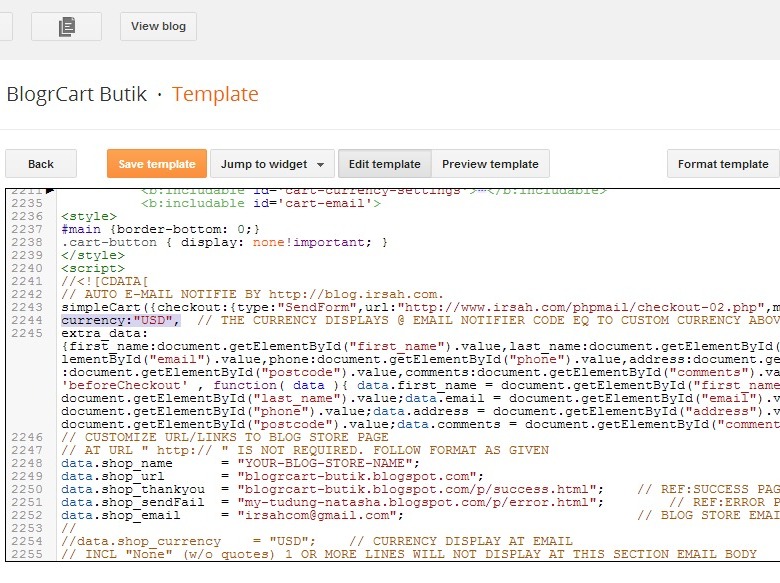
2.2 Customize Shopping Cart Currency
Expand <b:includable id='cart-currency-settings'> by clicking the black triangle.

2.3 Customize Shopping Cart Paypal Settings
Expand <b:includeable id='cart-paypal'> by clicking the black triangle.

Now edit your Paypal preferences here. A registered email with Paypal is required.
Include your Ref:Success URL & Ref:Error URL where applies.
How to check/grab your Ref:Success URL?
- Go to Pages > Hover to the "Success" link > click the "View" link to go to the "Success" page.
- At your browser, grab the URL at the browser bar.
How to check/grab your Ref:Error URL?
- Go to Pages > Hover to the "Error" link > click the "View" link to go to the "Error" page.
- At your browser, grab the URL at the browser bar.

2.4 Customize Shopping Cart Shipping Settings
Expand <b:includable id='cart-shipping-settings'> by clicking the black triangle.

Now customize your shipping selection here. Indicators provided for your reference.
If you do not require any shipping settings, then head over to <b:includable id='main'> & uncomment the shipping includes at below codes:-
<!-- b:include name='cart-shipping-settings' / -->

2.5 Customize Shopping Cart Tax Settings
Expand <b:includable id='cart-tax-settings'> by clicking the black triangle.

Now customize your tax selection here. Indicators provided for your reference.

If you do not require any tax settings, then head over to <b:includable id='main'> & uncomment the tax includes at below codes:-
<!-- b:include name='cart-tax-settings' / -->
2.6 Customize Shopping Cart Send Order Email Settings
Expand <b:includable id='cart-email'> by clicking the black triangle.

Edit the email currency at below codes:-
Edit the reference URL's to your created Blogger store pages at below codes:-
- Ref: Send Order URL ( ie: http://YOUR-BLOG-NAME.blogspot.com/p/send-order.html )
- Ref: Success URL ( ie: http://YOUR-BLOG-NAME.blogspot.com/p/success.html )
- Ref: Error URL ( ie: http://YOUR-BLOG-NAME.blogspot.com/p/error.html )
- Go to Pages > Hover to the "Send Order" link > click the "View" link to go to the "Send Order" page.
- At your browser, grab the URL at the browser bar.
How to check/grab your Ref:Success URL?
- Go to Pages > Hover to the "Success" link > click the "View" link to go to the "Success" page.
- At your browser, grab the URL at the browser bar.
How to check/grab your Ref:Error URL?
- Go to Pages > Hover to the "Error" link > click the "View" link to go to the "Error" page.
- At your browser, grab the URL at the browser bar.


Edit Blogger store paymentreference here, Important to not include any credit/debit/charge card numbers here.

Edit additional notes to include in your send order email here:-

IMPORTANT: All codes are required for the shopping cart plug-in. If areas is not required please leave empty (" ") or "None" or "-" at the respective codes where applicable.
FAQ's
Q - Why when I click the "Send Order" button in the cart slide down it goes to a Page Not Found?A - Please check that your Send Order page URL matches the ones in Step 5: "Drop Down View Cart Buttons & Url's. Also check on the conditional code structure of added spaces due to copy and pasting error".
Q - Hey! When I tried to click the send order button, It's diverts to Paypal. Why?
A - By default the shopping cart is workable and functional via the pre-sets included upon template install. Normally there can be 2 instances which could cause the errors:-
- Error in your customisations - This includes missing commas, missing colons, typo errors & not following the initial format given in template codes.
- You did not update Step No 2.1 "Insert Ref: Send Order URL". Expand <b:includable id='main'> by clicking the black triangle and insert the FULL URL to your SEND ORDER page here.
Q - Owh! Now when I click the Send Order at my checkout form button it goes to a Page Not Found. Why?
A - One or more settings in your "cart-email" did not follow the initial format provided. Normally the " http:// " protocol is included in the URL at your blog address, success page & error page. Remove the " http:// " and it will be working again.
Q - Why don't you guys build a Blogger widget for this template?
A - Good question! But we want you to familiarize with the codes & the shopping cart plug-in for Blogger templates. The plug-in itself is so versatile & by including simple line of codes, the plug-in can do what e-commerce store do! We want you to take full control on what can be displayed or not at your Blogger store via your own customizations. This way you are in full control, not dependable on an e-commerce shopping cart plug-in/widget. You can easily adapt/incorporate the functionality at your own Blogger template designed/builds too!
Any More Questions?
Send us an email at support [at] irsah [dot] com and one of our team members would lend you a hand.
- End of Shopping Cart Settings -